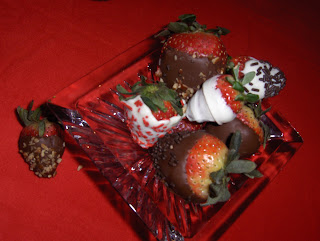
Welcome to "Tidbits, Tips, & Tutoral Tuesday!" I know Valentine's Day is now over, but who says chocolate covered strawberries are just for Valentine's Day?
Last night I decided to try my hand at chocolate covered strawberries for the first time. Seeing as how it was a definite learning experience for me, I thought I'd share a few tips I learned along the way.
First, I gathered the necessary supplies: strawberries, milk chocolate chips, white chocolate chips, some finely chopped pecans, and a few decorative sprinkles for that special touch. I also grabbed a large piece of styrofoam (from a recent package I'd received) & some toothpicks. Then I got to work.
Next, I washed & thoroughly dried the strawberries (I had read that if they were wet at all the chocolate wouldn't stick) & stuck a toothpick in the stem end of each one.
The next step was to melt the chocolate, & I must admit it took some trial & error (& some frustration) to figure out the best way to achieve the desired result. At first I tried melting a few chocolate chips in a bowl in the microwave, stopping and stirring them about every 30 seconds. I quickly learned that if the bowl tends to get hot in the microwave, the chocolate will go from not melted to burned in a matter of seconds! Error #1!
So then I decided I'd pull out the double broiler. I turned my burner to medium &, stirring continually, started melting the white chocolate chips. This seemed to be working for a short time, but by the time I had dipped 4 strawberries, the chocolate was beginning to get clumpy in the pan & wouldn't smoothly coat the strawberries. Error #2!
By this time I was really getting frustrated and decided to go ask my smart & creative hubby what he thought. (And yes, I was making the strawberries for him, but at this point, I was desperate!) Not sure exactly what we needed to do, we decided to try one more time, this time with the burner on low. And guess what? It actually worked this time! We had finally figured out the best method!
Now was the fun part! I, or should I say, we took each strawberry, and holding it by the toothpick, dipped it in the chocolate, twirling it as we took it out to catch any drips. Then we turned them upside down, sticking the toothpick in the styrofoam. The reason for this was to keep them from having a "flat" side when they hardened. (As a side note, you might want to try covering the styrofoam in foil or plastic wrap. We found that on a small number of strawberries, the chocolate dripped down, & when we removed the strawberry, a little bit of styrofoam was stuck to the chocolate! However, on the chocolate that we melted "correctly," the dripping wasn't an issue.) Before the chocolate hardened, we added some nuts & decorative sprinkles to a few of the strawberries. Then we simply put them in the refrigerator for a few minutes to harden the chocolate.
Voila! My (our) first chocolate covered strawberries!
And I might add, they were delicious!


