Wednesday, March 9, 2011

Wildcard Wednesday: Signs of Spring.....In My Kitchen

I just love the cheery colors and the brightness of spring, and although there aren't many signs of spring outside just yet, I'm adding a few of my own indoors.  I don't decorate nearly as much for spring as I do for fall, and definately not as much as I do for Christmas.  I guess there is just something about this time of year that makes me want more openness......an airiness, a lightness......around my house.  But there are a few key areas that I like to change with every season.  So over the next few Wednesdays, I'm going to share some of my "signs of spring" with you.
One area that I love to change with the changing seasons is this set of glass canisters by Gracious Goods.  I have another set of canisters that I use to actually store flour & sugar, so I bought this set with the pure intention of using it to decorate.  This last weekend, I replaced my "winteresque" glittery pinecones & acorns with some faux eggs and small nests.

(decorated for winter)

(decorated for spring)

I love the pop of color the eggs add to this area of my kitchen.  The nests are new this year.  Last year, I simply filled the canisters with the eggs.  I'm thinking next year I might use all turquoise eggs with the nests.  Of course, by then I'll probably have some other idea.  
You know me, I can hardly get one season of decorating finished before I'm already thinking about the next!

Tuesday, March 8, 2011

Tutorial Tuesday: Yummy Oreo Balls

I must admit, I have a weakness for Oreos.  There's just something about the combination of a crunchy chocolate cookie mixed with vanilla cream that makes my taste buds dance.  I like them in any shape or form: by themselves, in ice cream or a malt, or covered with chocolate!

So when I came across a "holiday" calendar a fews days ago that proclaimed March 6 to be "Oreo Cookie Day," I knew that gave me a good excuse reason to make one of my favorite treats: Oreo Balls. 


Here's what you'll need for this tasty treat:
1 package regular size Oreo cookies
8 oz. cream cheese
1 package white almond bark
approximately 1 tablespoon vegetable shortening
1 package Baker's dipping chocolate OR chocolate almond bark


Directions:
1) Allow cream cheese to soften for a few minutes. 
(I simply have it sitting out while I gather my ingredients & prepare my Oreos.)

2) Place Oreos in a resealable bag & crush.
(Sorry I forgot to take a picture after they were crushed!)
 3) Using a food processor, mix Oreos & cream cheese together. 
(If you do not have a food processor, a blender or hand mixer should also work, as long as you finely crush the Oreos beforehand.)

(Before Mixing)
(After Mixing)
4) Chill mixture for about 1 hour.

5) Roll into small balls (approximately walnut size).


6) Return Oreo balls to refrigerator (or freezer).  Melt white almond bark according to package directions (I prefer using a double broiler).  If almond bark appears too thick for dipping, add a little vegetable shortening to thin it out. 

7) Using a toothpick, dip Oreo balls into the melted almond bark & place on wax paper.  Allow to harden for a few minutes.  (To speed up the process, you can place Oreo balls in the freezer for a few minutes.)


8) While the white chocolate is hardening, melt Baker's dipping chocolate (or chocolate almond bark if you prefer) according to package directions. 

9) When Oreo balls have hardened (no longer sticky to the touch), drizzle chocolate on top.  You can do this by either using a sandwich bag with a tiny hole cut in one corner, or you can do as I did & simply use a spoon.  (My clever husband showed me that if you hold the spoon high enough, it will be a thin stream by the time it reaches them - rather than a big clump.)


10) Enjoy!!!


These are great for parties!  Not only are they fairly simple to make, but one batch makes 2-3 dozen.  Plus, their richness makes it difficult for most people to eat more than 2 or 3 at a time, making them last longer!  You can also freeze leftovers, and they'll keep for days.

Hmmm....now I'm craving another Oreo ball.  Good thing we still have several in our freezer!

Sunday, March 6, 2011

Scripture Sunday: The Tower of "Babble"

Now the whole world had one language and a common speech....Then they said, "Come, let us build ourselves a city, with a tower that reaches to the heavens, so that we may make a name for ourselves and not be scattered over the face of the whole earth."  But the Lord came down to see the city and the tower that the men were building.  The Lord said, "If as one people speaking the same language they have begun to do this, then nothing they plan to do will be impossible for them.  Come, let us go down and confuse their language so they will not understand each other."  So the Lord scattered them from there over all the earth, and they stopped building the city.  That is why it was called Babel - because there the Lord confused the language of the whole world.  Genesis 11:1, 4-9 (NIV)

I'm going to keep this short & sweet today, but I want to share two thoughts:

1) Obviously, there is nothing inherently wrong with constructing buildings or towers, but it was the motivation behind it that troubled God: their strong desire to make a name for themselves and their reliance on themselves, rather than on God. 

When I read this, I had to do a little self-reflection.  I don't know about you, but for me, too often I'm focused on what will help me look good and what will help me gain the approval of others.  Even when I initially start out doing something with the pure intention of glorifying God, it is all too easy to lose my focus along the way.  Ironically, it seems that it is often at the times that God is most blessing my endeavors, that pride kicks in and my focus quickly changes to myself.  Hmm, I'm noticing a recurring theme in my life lately of the need to not only glorify God, but also to seek acceptanceself-worth from Him!  (Click here to see related posts.)

Galations 1:10 says, "Am I now trying to win the approval of men, or of God?  Or am I trying to please men?  If I were still trying to please men, I would not be a servant of Christ."  Colossians 3:23 says this: Whatever you do, work at it with all your heart, as working for the Lord, not for men.  I Thessalonians 2:5 says, "....We are not trying to please men but God, who tests our hearts."  And finally, John 8:54 says, "Jesus replied, 'If I glorify myself, my glory means nothing....' "  Wow!  If even Jesus, who was God wrapped up in human form, didn't have the right to glorify himself, how much less do I?  God, may I only seek to honor and please You!  Please tear down any towers of pride in my life.

2) My second thought from this passage focuses on verse 6, which is where God states that if they are one people, speaking the same language, then nothing will be impossible for them.  Although this isn't typically the lesson or sermon we hear concerning this message, this verse made me stop and think a minute about the importance of communication.  So God is saying that if they can communicate purely, without any confusion or misunderstanding, that they can succeed in anything they do.  What does that say about the importance of communication in our relationships?  Our marriage?  On the job?  And of most importance, what about our communication with God?  My prayer is that God gives me the wisdom to know how to best communicate with those around me.  But more than that, I pray that my communication with God becomes all that it needs to be.  And by the way,communication doesn't just involve speaking, it also involves listening!

Saturday, March 5, 2011

Simplify Saturday: Zip Through Your Zones

It's that time of year again....the time that everyone begins thoroughly cleaning their homes, getting rid of clutter, making room for some new clutter! :) Since I've been sharing a few tips from Sink Reflections lately, I figured why not continue the pattern?  So here is another simple tip from this helpful book:

Instead of manically spring cleaning all at once, why not divide your house up into zones, and work on it a little at a time?  The author suggests dividing it into 5 zones:
1) entrance/dining room/front porch
2) kitchen
3) bathroom/children's room(s)/spare bedroom or office
4) master bedroom/master bathroom
5) living room/family room/den

She decided on 5 zones because there are usually about 5 weeks each  month, so each week of the month you can focus on a different zone.  She recommends working on the current zone for only 15 minutes to an hour each day, knowing that if you don't get everything finished, you can pick up where you left off the next month!  She also gives suggestions of exactly what needs to be done in each zone.

Due to my schedule, I prefer to divide my house into 6 zones, and only focus on one each month....which means overall, I "spring clean" my house twice a year.  If that's still too overwhelming for you, you could also take 2 months to clean each zone, and by the end of the year, you'd be done with the whole house.

No matter how you divide it up, the important part is that it's broken into smaller, more managable tasks, so that it feels much less overwhelming!  And when you know you only have to clean for a few minutes, you're more likely not to put it off! 

Before you know it, you'll be zipping through all your zones!

Friday, March 4, 2011

Friday Favorites: Knockout Roses

Awww, spring is in the air & I can hardly wait for it to get here.  The last couple days, except for being a bit windy (but when is it not windy in Oklahoma?), have been absolutely gorgeous. 

One thing I love most about the springtime is all of the beautiful, colorful flowers we have around our house.  For me, the more color, the better!   And of all of the flowers, one of my favorite is the bright pink Knockout Rose.  (For those of you who don't know, Mr. Dishaholic is a landscape designer and contractor, so I'm a little spoiled when it comes to beautiful landscaping.) 

Here's a photo taken of a flower bed in our front yard last spring.
 Aren't they beautiful?

Just a few short weeks and they'll be in full bloom again!

Thursday, March 3, 2011

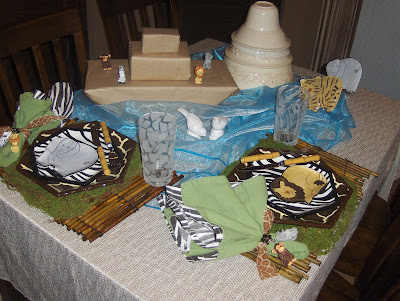
Tablescape Thursday: Lions & Tigers & Elephants, Oh My!

So God said to Noah, I am going to put an end to all people, for the earth is filled with violence because of them......So make yourself an ark.....I am going to bring floodwaters on the earth to destroy all life under the heavens, every creature that has the breath of life in it.  Everything on earth will perish.  But I will establish my covenant with you, and you will enter the ark - you and your sons and your wife and your sons' wives with you.  You are to bring into the ark two of all living creatures, male and female.....Noah did everything just as God commanded him.  Genesis 6:13-14, 17-19, 22 (NIV)


I must begin by telling you that this is unlike any tablescape I've ever done (& I must admit, it didn't turn out quite like I had envisioned it!).  In fact, it is so different from my usual style that I considered not posting it, but what fun is that?  I tend to lean toward doing more elegant (for lack of a better word) and seasonal tablescapes, but after blogging about "The Flood & The Blood" on Sunday, I thought it might be fun to do something a little different: a Noah's Ark tablescape.  I usually like to come up with a scripture verse that coincides with my tablescapes, but this time I figured I'd do it the other way around. 

Oh, and one more thing, I added a little challenge by attempting to construct as much of it out of dishes & tabletop accessories as possible!  This will all make a little more sense as you read on. 

So I invite you to jump ON BOARD and join me in embARKing on this JOURNEY (after all, the animals did go in PAIRS), but I must warn you, it's a ROUGH and WILD tablescape, and you'll be FLOODED with many pictures!  (Sorry, I went a little OVERBOARD.)  So grab an umbrella, hold on tight, and enjoy the RIDE as I POUR on the explanations!

(In case your wondering about that big cream colored thing in the back, no it's not a robot or a white chocolate fountain!  That's supposed to be a mountain! 
I'll show you a close up a little later on!)


I began by starting with a light tan tablecloth that reminded me a little of sand.  Then I fluffed up the turquoise blue table topper to resemble waves of water.  (As you can see, the water is beginning to subside.)


I decided to do 2 place settings symbolizing the pairs of animals.

I used bamboo placemats to symbolize the wood of the ark.  (I purchased these for $1.00 each at Dollar Tree many years ago!  I've since seen identical ones at other stores for over $5.00!)  To add a little texture and color to the place settings, I topped each placemat with a sheet of moss (borrowed from my spring decor). 


I chose giraffe dinner plates, followed by zebra salad plates, then topped each off with an animal appetizer plate....one with a lion.....
 

.....the other with an elephant.
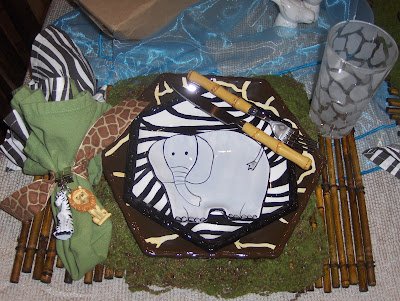

(When the idea occurred to me to do this tablescape, I remembered having seen these animal appetizer plates at Ross about a month or two ago.  So I made a quick trip, fully expecting that they'd be gone, but they still had a few!  And at less than $2.00, I figured they were worth it!)

Then I layered the plates with bamboo flatware and added animal print glasses.

(I have my giraffe glass lying down in this one for a little better look.)

I chose a mossy green napkin, layering it over a brown & cream zebra print napkin, so that just a hint of animal print was peeking out.  I tied each one with giraffe ribbon & then clipped on a couple of animals. (Those are actually tablecloth weights to keep the wind from blowing the tablecloth around, but I thought they'd be cute on the napkins.)

(Please excuse the black marks on the ribbon.  Those aren't really there.  My camera just decided to add them!)


Now for my centerpiece.  First I'll start with the "Mountain" of bowls, representing Mt. Ararat, the place where the ark landed.  In keeping with my challenge to primarily use dishes or tabletop accessories, I gathered several cream colored bowls of varying sizes, and simply stacked them upside down to resemble a mountain. 

Either those are some really big animals, or that mountain is the smallest mountain ever!


I decided I also need a few animals walking about, although technically the animals weren't out 'til the water was completely dried up!  Hmmm, is that tiger walking on water? 

I simply used small clear easels to hold the animal dishes.  (I had originally planned on having pairs of animals - 2 elephants & 2 tigers - but it looked too crowded.)

My pair of birds are actually salt & pepper shakers.  If you remember, Noah sent a bird out 3 times to test & see if the water had dried up.

And last, but not least, what's a Noah's ark tablescape without an ark?  Of course, I didn't have an ark just sitting around the house.  I considered trying to make one out of dishes, but quickly decided that was not going to be an easy task.  Not wanting to spend any money, I figured I'd just cover some boxes with brown paper to make my ark.  Truth be told, my attempt to make an ark wasn't turning out so well, so my super sweet hubby took over!  (I mean, how many husbands out there would take time to make an ark for their wife's tablescape?!)  And about 30 minutes later, I had an ark!

The ark is the only part of the tablescape not constructed out of dishes or tabletop materials, but 2 of the boxes originally came with some of my dishes....does that count?

Now, don't JUMP SHIP just yet.  I have one last surprise.  See those animals enjoying their ride on the ark? 


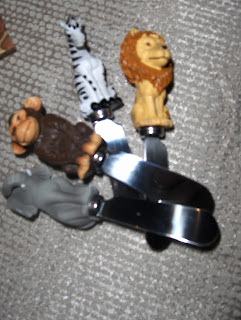
Well, they're actually little spreader knives!  That was another reason I decided to construct the ark out of cardboard.....so that I could use my spreader knives as the animals on board!


Just as I was finishing up, I decided to make one more change.  I wanted something to represent the rainbow that God created as a symbol to never again destroy the earth with a flood.  So I quickly changed out my animal glasses for these "rainbow" colored striped glasses.  Although I didn't like the overall look quite as well (it didn't exactly go with my color scheme), I thought it made the story complete. 


Well, hope you've stayed AFLOAT and survived this TURBULENCE!  Thanks for joining me on the journey!  And don't forget to stop by Between Naps on the Porch to see all the amazing tablescapes!


Tablecloth - Ross
Turquoise Table Topper - Tuscan Loggia (a local decor store)
Bamboo Placemats - Dollar Tree
Giraffe Plates - TJ Maxx or Marshalls
Zebra Plates - TJ Maxx, Homegoods, & Marshalls (I had to go all over to get a full set!)
Animal Plates - Ross
Bamboo Flatware - Steinmart
Animal Print Glasses - Dillards
Striped Glasses - Kohls (I think!)
Bird Salt & Pepper Shakers - TJ Maxx or Marshalls
Zebra Napkins - Z Gallerie
Green Napkins - Burlington (I think)
Animal Napkin Weights - Tuesday Morning
Animal Spreader Knives - either Ross or TJ Maxx
Mountain Bowls - Gracious Goods & Chris Madden from JC Penney